
Unity Tutorial - Interface Introduction

Unity Tutorial - When Unity first opens, you’ll see a window that looks like this:

The interface can be a bit overwhelming at first. Take a deep breath and tell yourself it’s going to be all right! :] The interface is highly customizable and can provide you with as much or as little information as you need.
In the upper right hand corner, you’ll see five buttons. Select the last one on the right which is called the em>Layout Dropdown, and from the list of options, select the 2 by 3option:

Your editor should now look like the image below and have the following sections:
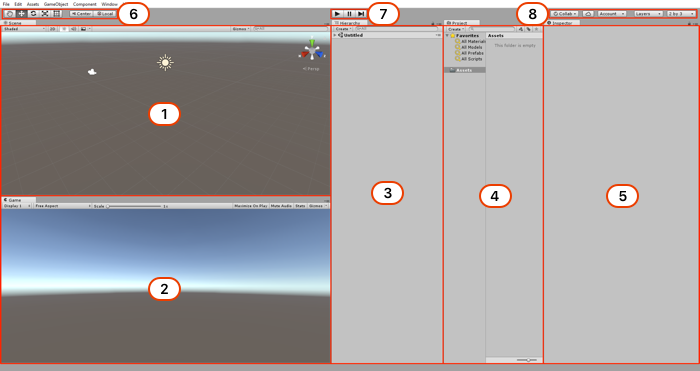
Here’s the breakdown of the various sections:
1. Scene View
The Scene view is where you construct your game; it’s where you add all models, cameras, and other pieces that make up your game. This is a 3D window where you can visually place all the assets you’re using like so:

As you test your game in Unity, the scene view will update itself with the current game’s state, and you can even add new elements on-the-fly to the scene. When you stop the game, the scene view will revert to its original state. Any changes you make to the Scene view while you’re playing the game will be lost when it stops.
2. Game View
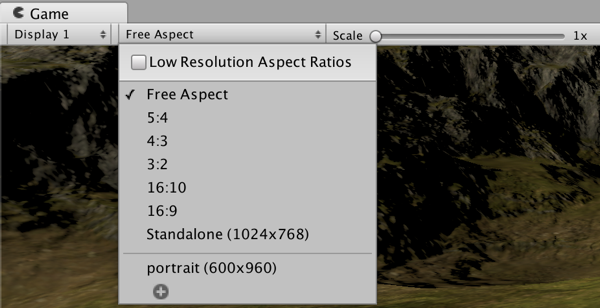
The Game view represents the player’s perspective of game. This where you can play your game and see how all its various mechanics work with one another:
The Game view has an aspect ratio selector, which lets you change the dimensions of the view to match that of a specific screen aspect ratio (e. g. 4:3, 16:9, 16:10 …) or a device screen size such as that of an iPhone or iPad. This allows you to make sure it looks good on all aspect ratios and resolutions you want to support and that no important content is cut off. You can add a custom aspect ratio using the Plus button at the bottom of the dropdown.
3. Hierarchy window
The Hierarchy window contains a list of all the current GameObjects being used in your game. But what is a GameObject? That’s an easy one: a GameObject is an object in your game.
OK, there’s a bit more to them than that! :] In essence, GameObjects are empty containers which you customize through adding components. Components permit GameObjects to project geometry (from a simple cube up to more complex 3d models of towers or monsters), emit light, act as camera or even create complex behavior via scripts.
GameObjects can also act like folders, containing other GameObjects, which makes them quite useful for organizing your scene. You’ll see GameObjects in action in the second part of this tutorial.
A scene typically represents a single level of your game, although you could theoretically put the entire game inside one scene. Any GameObjects actively being used in your game in the current scene will appear in the Hierarchy window:
Every new scene starts with a Main Camera and a Directional Light, which are both GameObjects.
When you delete a GameObject from the Hierarchy, you’re effectively removing it from the scene.
When you delete a GameObject from the Hierarchy, you’re effectively removing it from the scene.
As your scene grows with lots of GameObjects, the search bar will prove to be an invaluable tool:

4. Project window
The Project window contains all assets used by your game. You can organize your assets by folders, and when you wish to use them, you can simply drag those assets from the Project window to the Hierarchy window. Alternatively, you can drag them from the Project window to the Scene view. If you drag files from your computer into the Project window then Unity will automatically import those as assets for you.

Unity organizes the assets in the Project window the same as the OS file system. You may be tempted to make changes directly in the file system instead of in the Project window, but this is a big mistake that will break your assets – and possibly break your game!
Unity maintains metadata for each asset, so moving assets between folders on the file system breaks the metadata. If you need to make any organizational changes to your assets — especially prefabs — always perform them in the Project window.
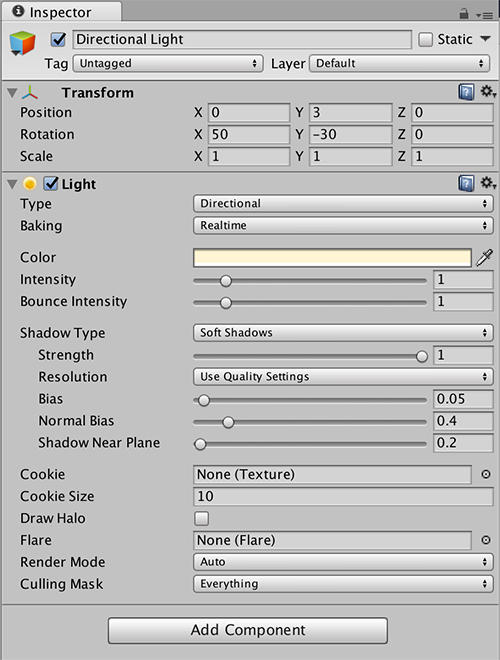
5. Inspector window
The Inspector window lets you configure any GameObject. When you select a GameObject in the Hierarchy, the Inspector will list all the appropriate components and their properties of that GameObject; for instance, a light will have a color field along with an intensity field. You can also alter values on your GameObjects while the game is being played.


No comments