
Kotlin - Environment Setup

Kotlin - However, if you still want to use Kotlin offline in your local system, then you need to execute the following steps to configure your local workspace.
Step 1 − Java 8 installation.
Kotlin runs on JVM, hence. it is really necessary to use JDK 8 for your local Kotlin development. Please refer to the official website of oracle to download and install JDK 8 or an above version. You might have to set the environment variable for JAVA such that it can work properly. To verify your installation in Windows operating system, hit “java –version” in the command prompt and as an output it will show you the java version installed in your system.
Step 2 − IDE installation.
There are a number of IDE available over the internet. You can use any of your choice. You can find the download link of different IDE in the following table.
| IDE Name | Installation Link |
|---|---|
| NetBeans | https://netbeans.org/downloads/ |
| Eclipse | https://www.eclipse.org/downloads/ |
| Intellij | https://www.jetbrains.com/idea/download/#section = windows |
It is always recommended to use the recent software version to drag out maximum facility from it.
Step 3 − Configuring Eclipse.
Open Eclipse and go to “Eclipse Market Place”. You will find the following screen.

Search for Kotlin in the search box and install the same in your local system. It might take some time depending on the internet speed. You may have to restart your Eclipse, once it is successfully installed.
Step 4 − Kotlin Project.
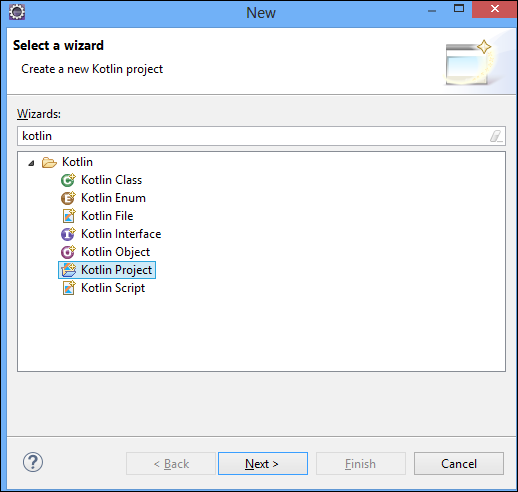
Once Eclipse is successfully restarted and Kotlin is installed, you will be able to create a Kotlin project on the fly. Go to File → New → Others and select “Kotlin project” from the list.
Once the project setup is done, you can create a Kotlin file under “SRC” folder. Left-click on the “Src” folder and hit “new”. You will get an option for Kotlin file, otherwise you may have to search from the “others”. Once the new file is created, your project directory will be look like the following.

Your development environment is ready now. Go ahead and add the following piece of code in the “Hello.kt” file.
Live Demofun main(args: Array<String>) { println("Hello, World!") }
Run it as a Kotlin application and see the output in the console as shown in the following screenshot. For better understanding and availability, we will be using our coding ground tool.
Hello, World!


No comments